Today I was just feeling a bit tired and needed to take a break from crafting, taking photos and writing everything up. So I created the Our Islamic World Word Search for the girls to do. I figured it would keep them busy for at
least a little while so I can take a nap. Hope you enjoy it too.
If you'd like to learn more about the countries with the highest population of Muslims, please visit this page.
Tuesday, July 31, 2012
Monday, July 30, 2012
Mosque Banner Tutorial
Going along the same theme as our Star Banner from last year, this time
around we decided to make a Mosque Banner to decorate our walls.
Supplies
Crepe paper
Scissors
Stapler
Pen
Ruler
First you'll need to measure out 2 inches on your crepe paper and make a fold. Keep making accordion folds until your banner is long enough.
Use your imagination to draw out a mosque design. Don't forgot the doors and windows!
Staple the crepe paper where you are going to cut out the design. This step is important for little hands that will have a hard time holding the paper and cutting at the same time. Notice how we also put staples in the doors.
Cut out your design.
Unwrap your crepe paper and enjoy your banner!
We had so much fun making one that we made several, experimenting with the dome and size of doors and window shapes. This is a very inexpensive craft that you can play with for hours!
 |
| Mosque Banner Tutorial |
Crepe paper
Scissors
Stapler
Pen
Ruler
First you'll need to measure out 2 inches on your crepe paper and make a fold. Keep making accordion folds until your banner is long enough.
Use your imagination to draw out a mosque design. Don't forgot the doors and windows!
Staple the crepe paper where you are going to cut out the design. This step is important for little hands that will have a hard time holding the paper and cutting at the same time. Notice how we also put staples in the doors.
Cut out your design.
Unwrap your crepe paper and enjoy your banner!
We had so much fun making one that we made several, experimenting with the dome and size of doors and window shapes. This is a very inexpensive craft that you can play with for hours!
 |
| Mosque Banner Tutorial |
Sunday, July 29, 2012
Ramadan Good Deeds Sticker Book
During this month, my kids are doing a lot of good deeds for Ramadan. We made these sticker books for them to hold the stickers before they go on the good deed wall poster. This way they get to pick out the sticker before it goes on the poster.
First take your envelopes and cut off the flaps.
Affix the double sided tape at the center ofthe top edge and stick the envelope to the next envelope. Make sure they line up.
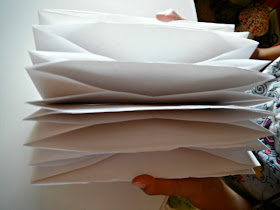
Once all the envelopes are all lined up, they'll look like this:
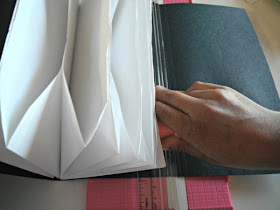
Where you marked off the twelve envelopes taped together, you'll want to make a couple of score lines. If you don't have a score machine like mine below, you can use a bone folder.
Place double sided tape to the outer edges of the envelopes to attach them to the cover.
Score the top of the cover for the outside flap to fit over the taped envelopes.
Add the Velcro tabes to the inside of the cover.
Using the duct tape, add it to the edge of the cover to give it extra thickness.
Decorate the duct tape with some colored tape.
Your good deeds book is now ready for stickers!
Supplies
12 blank envelopes
Black poster board paper
Duct tape
Scissors
Self sticking Velcro
Double sided tape
Ruler
Scorer
First take your envelopes and cut off the flaps.
Affix the double sided tape at the center ofthe top edge and stick the envelope to the next envelope. Make sure they line up.
Once all the envelopes are all lined up, they'll look like this:
To measure out the size of the file folder: lay out three extra envelopes and put the taped envelopes between them. This will give you the thickness. Using the ruler, mark off the diminstions and cut out the cover.
Where you marked off the twelve envelopes taped together, you'll want to make a couple of score lines. If you don't have a score machine like mine below, you can use a bone folder.
Place double sided tape to the outer edges of the envelopes to attach them to the cover.
Score the top of the cover for the outside flap to fit over the taped envelopes.
Add the Velcro tabes to the inside of the cover.
Using the duct tape, add it to the edge of the cover to give it extra thickness.
Decorate the duct tape with some colored tape.
Your good deeds book is now ready for stickers!
Saturday, July 28, 2012
Syria is in My Heart Necklace
Can you believe it's been over a year since our last Syrian craft? Back then we talked about the Syrian people and the suffering that they are enduring. Well, here it is, one year later, and things are not better. In fact, they seem to be getting worse. Today we wanted to make this Syria is in My Heart Necklace so we can hold them close to our thoughts and prayers.
Fold your paper plate in half and draw out half of a heart on one side. Cut out the heart shape.
Draw a green line about a third of the way down color in the top half of the heart. Draw a black line at the bottom half of the heart and color in that part black.
Color the three star shapes red. Notice we are honoring the new Syrian flag for this project by using the three red stars.
Glue the three red stars down in the center of the heart.
Tape down the paperclip to the back of the heart.
Thread the ribbon through the paperclip.
Wear the Syrian flag close to your heart.
Supplies
Paper plate
Glue
Ribbon
Tape
Paperclip
3 wood stars
Scissors
Green, red and black markers
Fold your paper plate in half and draw out half of a heart on one side. Cut out the heart shape.
Draw a green line about a third of the way down color in the top half of the heart. Draw a black line at the bottom half of the heart and color in that part black.
Color the three star shapes red. Notice we are honoring the new Syrian flag for this project by using the three red stars.
Glue the three red stars down in the center of the heart.
Tape down the paperclip to the back of the heart.
Thread the ribbon through the paperclip.
Wear the Syrian flag close to your heart.
Friday, July 27, 2012
Arabic Newspaper Hairclip
Since we have so much Arabic newspaper left over from our last craft, today we thought it might be fun to make a hairclip.
Supplies
Newspaper
Scalloped edge punches (various sizes)
Brad
Hairclip
Small hole punch
Use the hole punches to punch out some shapes.
We used three different sizes. We also punched a lot of flowers out so that we could pick good ones with nice random images. And now we have extras to make more hairclips!
Gather up about four of each size of punch and stack them together from largest to smallest. Using your small hole punch, punch a hole in the middle.
Place your brad in the hole.
Take each layer of flower and scrunch it up with your fingers.
Keep doing the same to all the layers untill your flower looks like this:
Put it in your hair and enjoy!
Supplies
Newspaper
Scalloped edge punches (various sizes)
Brad
Hairclip
Small hole punch
We used three different sizes. We also punched a lot of flowers out so that we could pick good ones with nice random images. And now we have extras to make more hairclips!
Gather up about four of each size of punch and stack them together from largest to smallest. Using your small hole punch, punch a hole in the middle.
Place your brad in the hole.
Close up your brad in the back over your hair clip. (We forgot this part of the process and had to add it to the end, that's why you don't see the hair clip in the next two photos. :)
Take each layer of flower and scrunch it up with your fingers.
Keep doing the same to all the layers untill your flower looks like this:
Put it in your hair and enjoy!
Thursday, July 26, 2012
Lebanese Cedar Bead Tree Tutorial
I'm a big fan of the Lebanese Cedar Trees. These Cedrus libani are a species of cedar native to the mountains of the Mediterranean region. They have been used by various ancient civilizations, including the Phoenicians, Egyptians and the Sumerian Epic of Gilgamesh.
The Lebanon Cedar is the national emblem of Lebanon, and is displayed on the Lebanese flag and coat of arms. Lebanon is sometimes metonymically referred to as the Land of the Cedars.
Today we thought it might be fun to make a little piece of Lebanon to decorate our living room.
Supplies
White canvas
Paper with cedar tree image
Carbon paper
Tracing tool (or pencil works too)
Green beads
Brown beads
Glue gun
After you finish all the brown beads, your canvas will look like this:
Start with the green beads and very slowly go over the image again to cover all the leaves.
Your finished artwork will look like this when you are done:
Here are a couple of close ups of the tree. You can leave it like this, or put it in a shadow frame like we did in the first photo above.
The Lebanon Cedar is the national emblem of Lebanon, and is displayed on the Lebanese flag and coat of arms. Lebanon is sometimes metonymically referred to as the Land of the Cedars.
Today we thought it might be fun to make a little piece of Lebanon to decorate our living room.
 |
| Lebanese Cedar Bead Tree Tutorial |
White canvas
Paper with cedar tree image
Carbon paper
Tracing tool (or pencil works too)
Green beads
Brown beads
Glue gun
First you have to explain to your child what carbon paper is and what it was used for. (We ended up going online to find photos of typewriters!) Then, place the carbon paper between the cedar tree image and the canvas and trace out your design.
Your canvas will look like this:
Next, heat up your glue gun and start with the brown beads. Place a bit of glue and randonly put some brown beads down.
Don't put too much glue on your image at one time since the glue dries very quickly. Please be careful of little fingers as the glue is very hot. Rigth after I took this photo, my little one burned her finger and we had to ice it right away. Please be mindful!
After you finish all the brown beads, your canvas will look like this:
Start with the green beads and very slowly go over the image again to cover all the leaves.
Your finished artwork will look like this when you are done:
Here are a couple of close ups of the tree. You can leave it like this, or put it in a shadow frame like we did in the first photo above.
 |
| Lebanese Cedar Bead Tree Tutorial |
 |
| Lebanese Cedar Bead Tree Tutorial |


