Tuesday, June 30, 2015

Guest Blogger Post - Libyan Sharmoula Tutorial

Guest Blogger Post - Libyan Sharmoula Tutorial by A Crafty Arab

We are taking the day off here on A Crafty Arab because we blogged a post about Libyan Sharmoula over at Maroc Mama!

Come on over and check out our Libyan Sharmoula recipe as part of Maroc Mama's Digging into the Islamic World this Ramadan series.

Be sure to head over to follow her on Facebook, Twitter, and my new favorite social media, Instagram!

Monday, June 29, 2015

Starry Memo Center Tutorial

Starry Memo Center Tutorial by A Crafty Arab

In this day and age of texting and apps, we sometimes forget to leave notes to each other the old fashioned way.

Today as part of the 30 Day Ramadan Crafty Challenge, we put together these starry memo magnet holders for the fridge.

Supplies
Cutting mat
Decorative tape
Star wood shapes
Clothespins (large for adult, small for kids)
Magnets
Ruler
Xacto
Colored markers
E-6000
Starry Memo Center Tutorial by A Crafty Arab
Use your marker to color your clothespin. We did this to the three smaller ones for the kids.
Starry Memo Center Tutorial by A Crafty Arab

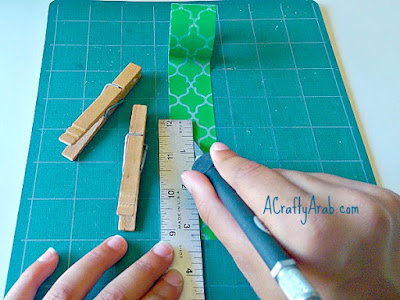
Place the decorative tape on your cutting mat and cut out the size you need to cover your adult clothespins.
Starry Memo Center Tutorial by A Crafty Arab

Write the names with marker of each family member on the stars.
Starry Memo Center Tutorial by A Crafty Arab

Put a dap of E-6000 on the clothespin and add the star name to the front of your clothespin.
Starry Memo Center Tutorial by A Crafty Arab

Turn your star over and add a magnet to each back side with the E-6000.
Starry Memo Center Tutorial by A Crafty Arab

Let the glue dry overnight and use your memo board to leave love notes, reminders or money for your family.
Starry Memo Center Tutorial by A Crafty Arab

Sunday, June 28, 2015

Eid Tissue Paper Art Tutorial

We love to use tissue paper as a medium for our crafts because it is so inexpensive.

In fact I got the package that we used today from the thrift store for a few dollars and it will last us the rest of the year. 

We have used it on Star and Mosque Banners, Making a Soos, a Crescent Moon Puff DiscPaper Lanterns and most recently our Allah Framed Art. There are another half dozens tissue paper crafts on Pinterest also.

Today as part of our 30 Day Crafty Challenge we used tissue paper again to create Eid Art.


Supplies
Plastic mat
White cardstock
Yellow cardstock 1/2 inch wider
Scissors
Brush
Mod Podge
Tissue Paper

Cut various sizes of stripes from different colored paper. For the letter D, we folded a piece over and cut half of a U shape. We also cut two 1 1/2 inch squares for out Khatam 8 pointed star.

Play around with your paper until you get a design you like.

When you are happy with the design, layer a thin coat of Mod Podge on your white cardstock. It's always best to do this over a plastic mat.

Lay your colored paper over and add another thin layer of Mod Podge. Keep adding and layering your cut tissue.

Layer your two cut squares over each other for the Khatam star.   Add a thin layer on the yellow cardstock.

Evenly place your white cardstock over your yellow and add a final thin layer over the entire masterpiece.

Let it dry for a few hours.

Your art work is ready. You can
-punch a whole on top and hang it on your front door
-place it in a picture frame and hang it from your wall
-laminate it and use it as a placemat
-put it in an oversized envelope and mail it as a gift

Saturday, June 27, 2015

Quran Candy Nuggets Tutorial


The Month of Ramaḍān is the month in which the first revelations of the Holy Qur’ān came down to the Prophet Muḥammad (Peace Be Upon Him).

It is widely reported that the first verses of the Holy Qur’ān revealed to the Prophet (PBUH) as He meditated in the Cave of Hira was the Sūrat al-Iqrā:
Iqrā’ bi-smi rabbika’lladhī khalaqa
Khalaqa al-insāna min ‘alaqin

Iqrā’ wa rabbuka al-Akramu

Alladhī ‘allama bi’l-qalami

‘Allama’l-insān ma lam ya‘lam
It is translated as such:
Read: In the name of your Lord Who created
Created man from a clot
Read: And your Lord is most Generous
Who has taught by the Pen
Has taught man that which he knew not.
(Holy Qur’ān 96:1-5)
To help celebrate the importance of books and reading in Islam, our project today involves making these Surat al- Iqra Quran Candy Nuggets 

After your children eat the nuggets, tell them to keep the piece of paper to help them memorize this treasure.

Supplies
Hershey's Nuggets
Cardstock
Glue
Ribbon
Surat al-Iqra printout

Along with using the Hersey's Nuggets for their size, we are also using them because in English the word 'nugget' also means a  tidbit of wisdom.

Place two Nuggets on your cardstock and cut out. Use this template to cut out the rest of the rectangles.

Put a dap of glue and place the ribbon down the middle of the cardstock.

Glue the Nuggets to the cardstock, two on each one.

I cut and pasted the words to the Sūrat al-Iqrā in a word document at a 7 size font and printed it out in columns. Cut them out in strips to fit over the Nuggets.


Fold it in half.

Glue the Surat on top of the Nuggets and fold over the ribbon.  We also put a tiny bit of glue on the bottom of the ribbon, making sure it doesn't cover any writing.

Your Quran Nuggets are all ready to hand out to the kids!

Friday, June 26, 2015

Guest Blogger Post - Islamic Daily Salat (Prayer) Chart Tutorial

Jumma mubarak (Arabic for happy Friday)

I am a guest blogger today over at Multicultural Kids Blog

Come on over and check out our 30 Day Ramadan Crafty Challenge project there: an Islamic Daily Salat (Prayer) Chart Tutorial.

Islamic Daily Salat (Prayer) Chart Tutorial by A Crafty Arab

This post was part of MKB Ramadan for Kids series. Follow along as we share crafts, activities, and other special ways to teach children about Ramadan!

Be sure to find us on Instagram with the hashtag #MKBKids.  It is so captivating to follow so many moms all across the world raising their multi cultural kids!

Thursday, June 25, 2015

Amazigh Inspired Shrinky Dink Bracelet Tutorial

Amazigh Inspired Shrinky Dink Bracelet Tutorial by A Crafty Arab

Amazigh are an indigenous ethnic group that live in Africa.  They follow a nomadic lifestyle but generally tend to hang in countries like Mauritania, Morocco, Algeria, Tunisia, Libya, Egypt, Niger, Mali and Burkina Faso.

In the past, they have mistakenly been refered to as "Berbers." This term was given to them by a Roman general and was later found in Muslim historical documents. They name they prefer is Amazigh, or Imazighen the plural, which means "free and noble men."

Amazigh jewelry is beautiful because it was one of the few things that the nomadic lifestyle could support.  Since the groups usually picked up camp and traveled from place to place, adornment that would go on walls as paintings or quilts in other homes turned into art that was shown in personal adornment and cloth weavings.

Cynthia Becker, a professor of art and architecture history at Boston University, explains how "the body adornments are not only masterpieces of thier identity, but also reveal the strength of women within their tribal worlds."

Inspired by looking at Amazigh jewelry online, we came up with this gold and black bracelet to honor my Amazigh Taita (Arabic for Grandmother) from Derneh, Libya. Allah Yarhamha (May God Rest Her Soul)

Supplies
Oversized stamp
Black shrinky dink
Circle cutter
Hole punch
Oval rings
2 Pliers
Clasp
StazOn ink (works on plastic)
Cutting mat

Amazigh Inspired Shrinky Dink Bracelet Tutorial by A Crafty Arab

Stamp your design on the shrinky dink three times on one sheet, leaving plenty of room for cutting.
Amazigh Inspired Shrinky Dink Bracelet Tutorial by A Crafty Arab

Your will have six stamps when you are done.  Leave them out in the sun to dry.
Amazigh Inspired Shrinky Dink Bracelet Tutorial by A Crafty Arab

Use your circle cutter and cut out the designs. Use your hole punch to cut out two holes across from each other.
Amazigh Inspired Shrinky Dink Bracelet Tutorial by A Crafty Arab

Laying two at a time in your oven tray, bake them according to instructions.
Amazigh Inspired Shrinky Dink Bracelet Tutorial by A Crafty Arab

Your design will shrink to about a third of the side of the original.  Here we've put the two together so you'll get an idea.
Amazigh Inspired Shrinky Dink Bracelet Tutorial by A Crafty Arab

Take an oval ring and attach two gold circles to each other, contine to attach until you get to the end two.  Use two more oval rings and attach a clasp to one end.
Amazigh Inspired Shrinky Dink Bracelet Tutorial by A Crafty Arab

Your bracelet is done and now you are ready for an Eid party!
Amazigh Inspired Shrinky Dink Bracelet Tutorial by A Crafty Arab

I love the details of the stamp and wanted to take a close up so you can see how much it looks like carved gold.
Amazigh Inspired Shrinky Dink Bracelet Tutorial by A Crafty Arab

Wednesday, June 24, 2015

Ramadan Crescent Moon & Star Podgeable Tutorial

In our house, we are in love Mod Podge and have had to resort to buying the larger sized bottles due to our excess usage.

It is an amazing glue and finish together. You only need a thin layer to work but the most important element of it's design is that it is non-toxic for children. 

It comes in a variety of formulas, including gloss, which is what we are using today. Don't mind that the bottle says matte, we just refill our small bottle. After trying both, I have found that the kids like the shininess of the gloss much more, while I like the matte for my own products.

Right before the month of Ramadan, I headed to our local craft store to stock up and I found these podgeable metal blanks in the same aisle. 

We pulled them out today to make these adorable Ramadan crescent moon and star necklace and earring jewelry set.


Supplies
White glitter
Blue glitter
Mod Podge
White cardstock
Blue cardstock
Brush
Oval rings
Earring clasps
2 Sets of pliers
Round punch - 2 sizes
Moon and star punch
Podgeable metal blanks


Start by punching out one blue circle with the large punch and two white circles with the smaller punch from your cardstock. Don't throw away your leftovers, you'll need them again later!
 

Use brush to place a thin layer of Mod Podge on your metal blanks and add your circle punches.

Pour blue glitter over the large circle and white glitter over the two smaller circles.

Punch out two moon and star cut outs from the blue and one set from the white cardstock you had set aside.

Place your cut outs in your metal blanks over their contrasting color.  Pour a thick layer of Mod Podge over the whole thing and let dry for a few hours.  We put ours in the window sill. If you do leave yours out overnight, put a plate over them to keep pets and dust away.

Use your two jewelry pliers to open an oval ring and add one small circle and an earring clasp. Close the oval ring with your pliers.  Also add an oval ring to your larger circle and attach a ribbon, silver, cord, or any type of chain you would like to your necklace.

Enjoy your jewelry or save the set to give away as an Eid gift!

Tuesday, June 23, 2015

Ramadan Woolly Play Tutorial


We have made plenty of sheep projects over the years on A Crafty Arab blog.  I even compiled them in a list last April so they would be easy to find on this post called 99 Sheep Creative Projects.

Sheep play an important role in Islam. They are eaten because of their significance in the religious story of Abraham scarifying his son to God. Instead at the last moment, Allah (Arabic for God) provided a ram so that Isaac may live. Now, a goat, sheep, camel, or cattle is sacrificed on religious holidays and 3/4 of the meat is donated to the poor.

Inspired by some of the sheep in the list, my youngest daughter and I made this sheep trio. 

Her older sister made her the backdrop out of a cereal box and some paint.  She simply opened up an empty box, painted the curtains and stars, then taped the bottom to make it stand.

Supplies
Black straws
Black Sticky back foam
White Sticky back foam
3 Toilet paper rolls
Pencil
Scissors
Glue
Googly eyes
Cardstock
Cotton balls


Start by cutting your black straw in half and then in half again for four equal pieces.

Take your pencil and poke four holes into your toilet paper roll. Place glue on the ends of your straws and insert them into the holes

Quickly insert a few cotton balls into the toilet paper rolls to stick to the straws inside. add glue to the bottom of your sheep, between the legs and start adding cotton balls to the toilet paper roll. Keep going until you cover your whole sheep.

On your cardstock, draw out a sheep face template and a small cloud. Cut out the outline.

Place the templates on the back of the sticky back foam and trace out the outlines. Cut out the head from black foam and the cloud from the white foam.

Take the back off the white cloud shape and place it on the forehead of the sheep face.  Glue on two dots and put on googly eyes.

Take off the back of the black foam and place it over either end of the sheep.  Glue on a few more cotton balls to the other end and your sheep are ready for opening night!

Related Posts Plugin for WordPress, Blogger...