Wednesday, July 22, 2015

Creative Muslim Women collective

A few weeks ago I joined a new collective called Creative Muslim Women.

This group was developed to create a safe space for sharing the trials and triumphs of being a professional or hobbyist, female, Muslim creative.

I'm very excited to see what develops. From the website -
Creative Muslim Women, is a vibrant community of diverse Muslim women who identify themselves somewhere on the broad spectrum of Creative. Our membership ranges from world renowned writers, artists and makers who are top of their niche, successful entrepreneurs, bloggers, designers to those who are aspiring and those there to be inspired.


Creative Muslim Women collective

Creative Muslim Women on Social Media

Monday, July 20, 2015

30 Day Ramadan Crafty Challenge Roundup (2015)

30 Day Ramadan Crafty Challenge Roundup (2015) by A Crafty Arab

When my three daughters and I began the 30 Day Ramadan Crafty Challenge back in July 2011 it was because there were no creative website that met our heritage and cultural needs.

As I artist, I had the resources to create crafts for them in my studio, at the same time spending time with them individually talking about Islam, Ramadan and my childhood memories of family. Our tradition has continued annually through 2012, 2013 and 2014.

I hope you enjoyed our activities over the month, feel free to also check them out visually on Pinterest and presented here alphabetically -

1.  Amazigh Inspired Shrinky Dink Bracelet Tutorial
2.  Arabic Initial Tote Tutorial
3.  Arabic Ramadan Countdown Tutorial
4.  Crescent Moon and Star Traveling Tic-Tac-Toe Tutorial
5.  Eid Decorative Plate Tutorial
6.  Eid Hol(e)y Lanterns Tutorial
7.  Eid Puff Flowers Tutorial
8.  Eid Tissue Paper Art Tutorial
9.  Guest Blogger Post - Islamic Daily Salat (Prayer) Chart Tutorial
10. Khatam Ramadan Matching Game
11. Khatam Ramadan Window Clings Tutorial
12. Kirigami Khatam Tutorial
13. Guest Blogger Post - Libyan Sharmoula Tutorial
14. Morocco Flag Candy DIsh Tutorial
15. Origami Khatam Tutorial
16. Patchwork Post-it Crescent Moon and Star Art Tutorial
17. (Perler Sheep) Ramadan Mubarak 1436/2015
18. Polymer Clay Moon and Star Tutorial
19. PomPom Kuwaiti Flag Tutorial
20. PomPom Sheep Tutorial
21. Pyramid Paper Lantern Tutorial
22. Quran Candy Nuggets Tutorial
23. Ramadan Banner Tutorial
24. Ramadan Crescent Moon and Star Podgeable Tutorial
25. Guest Blogger Post - Ramadan Reminder Shrink Plastic Charm Tutorial
26. Ramadan Woolly Play Tutorial
27. Starry Memo Center Tutorial
28. Three Gold Eid Cones Tutorial
29. Yemeni Trivet Tutorial
30. Zakat Shadowbox Tutorial

30 Day Ramadan Crafty Challenge Roundup (2015) by A Crafty Arab

Friday, July 17, 2015

Three Gold Eid Cones Tutorial & Eid Mubarak 2015


We did it!  Our household survived another Ramadan with children. 

We had cheat days, we had looooong days, we had whiney days, we had extra prayer days.  You name it, we did it.  We adjusted to having an Islamic holy month in a Western culture, in an area with an average of way too many hours of sunshine in July. And did I mention swim team?

We'd like to say shukran to those that followed along on Instagram, Pinerest, Twitter, and Facebook.  Your comments have been enjoyed and discussed.  We are blessed to be surrounded by so many creative, encouraging souls.

I will do a wrap up for the 2015  30 Day Ramadan Crafty Challenge next week.  But now, we plan on unplugging, after a full month of social media (see links above) for the weekend.  We hope to visit friends, hike in nature, share desserts, volunteer and just hanging out playing some of the games we made up over the month.

For today, here is a little tutorial that the girls don't know I made as an extra Eid gift for them.  They are little gold and green cones, filled with the most special kind of candy at our house, peanut m&ms.  These little treasures will be hidden somewhere on our hike this weekend and the girls will  spend some time on a scavenger hunt finding them.


Supplies
Large basket
Foil gold origami paper
Circle template
Circle cutting tool
Green tissue paper
Twist ties
Scissors
Glue
Floral large punch
Double sided tape
Peanut M&Ms
Green Eid Decorations
Sharpie
 
Lay out your tissue paper and place your large basket upside down to trace out a circle. Cut this out.
 
Use the circle template and tool to cut out a smaller circle from the origami paper.

Place a small amount of glue on the back of the origami paper and place it in the center of the tissue paper circle. Our glue seeped through, so we turned our project over so it would not glue down to the table. Let this dry for a few minutes.

Cut three lines into the circle to the center, making three fan shapes.
 
Turn your fan into a cone shape and run one line of glue down a side.  close it up and wait for it to dry.

Print out the Green Eid Decorations free pintables and use the floral large punch to cut out your tags.

Use the double sided tape on the back side of the tags and add them to the gold part of the cone.
 
Fill the cones with your favorite candy and use the twist ties to close them up.  If you are worried about any of the glue and open candy, feel free to use pre-wrapped candy.  I've got hardy PNW girls who will be digging in a forest for these, so it is what it is. :)
 
Happy hunting!
 

Thursday, July 16, 2015

Ramadan Banner Tutorial


Wow, can you believe Ramadan 2015 is over?  Doesn't it feel like it just started yesterday? We have done so many crafts during our 30 Day Ramadan Crafty Challenge and I just wanted to say shukran (Arabic for thank you) for joining us!

What better way to end the month then completing the banner on our Arabic Ramadan Countdown?  Yes, it's the first major project we did for the month, but one of my favorite quotes from Prophet Mohamed (Peace be upon him) is “If the Day of Judgment erupts while you are planting a new tree, carry on and plant it.”

So it's never too late to finish what you started!  Keep busy as much as you can, even if it means completing a project one month later.

Supplies

Our chipboard box of letters had mismatched left over letters, some of which were covered in English words.  We picked out a few and will now make them all look alike.

We start by taking them outside and spray painting them all the same color as our Ramadan calendar.

While the letters are drying, we headed back inside and put Mod Podge on the chipboard banner pieces.

We laid the glued side down to our wrong side of the paper.  To make the pattern the same on all the way across, try to make the placement of the chipboard pieces symmetrical.

While those were drying, we grabbed ourletters from outside and laid them flat on the file folder.
We added a thick layer of Mod Podge to the front of them.

We took our time putting on all four of the different glitter colors.

Just a side note, we picked the colors of the glitter to match the colors of the printouts! The yellow and purple glitter is flowers and the teal and white glitter is stars.

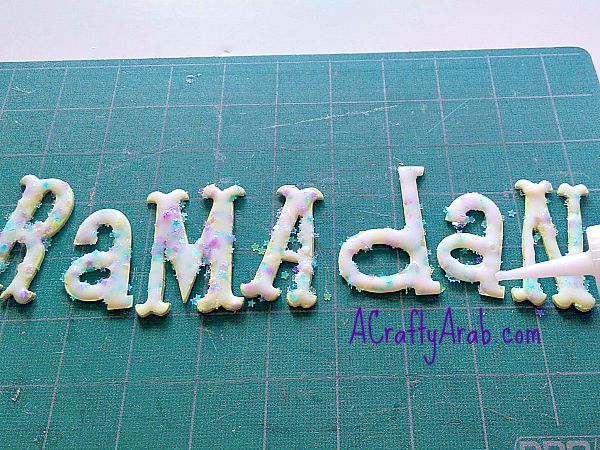
Once the glitter has sat for an hour or so to set, we moved the letters to our cutting mat and added a layer of diamond glaze.  We were able to pick up the file folder of glitter and fold it in half to throw away, no mess! 

Our letters sat to dry for most of the day. I'd recommend letting them sit overnight if there is not enough sun where you are doing this craft. In the evening, we went back to add a layer of Mod Podge to the chipboard banners, then a layer to the back of the chipboard letters and put them together.

Let the glue dry for a little while, then take your hole punch and add two holes, once on each side of your chipboard banner pieces.

Add your cord to your letters.

Your board is done and ready to string up!

I love how all the letters look the same now.  No one would know that they were all different just a few hours ago!

Wednesday, July 15, 2015

PomPom Kuwaiti Flag Tutorial

PomPom Kuwaiti Flag Tutorial by A Crafty Arab

My girls and I are still on our quest to make a craft from each Arab country and today we have decided to work on Kuwait by making this pompom flag door hanger.

Supplies
Pompoms in red, green, black and white
Pipe cleaners in red, green, black and white
6x9 sticky back foam
Scissors
Hole punch

Start by taking your four pipe cleaners and twisting them together super tight.

Then take your hole punch and make two holes on either side of the short 6 inch part of the sticky foam.

String your twisted pipe cleaner in each hole, twisting it back on itself.  Make sure you only do the foam and not the sticker back.

Pull the sticky back as you add the pompoms.  If you can't find the sticky back foam, just use regular foam and add glue to this step.  Here is the order -
Row 1 - 1 black, 7 green
Row 2 - 2 black, 6 green
Row 3 & 4 - 3 black, 5 white
Row 5 - 2 black, 6 red
Row 6 - 1 black, 7 red

Cut off the excess sticky back and save it for another flag!

Hang your Kuwaiti flag up someplace with pride for everyone to see.


Tuesday, July 14, 2015

Zakat Shadowbox Tutorial

Zakat Shadowbox Tutorial by A Crafty Arab

Zakat is one of the 5 pillars of Islam. 

As Muslims we must give a certain percentage of our money away to the needy and less fortunate.  We strive to donate at least 2-10% of the value of our possessions and income.

We try to make a new Zakat box every year to fill up by the year's end.  Okay, it's July and we are just starting, but it's never too late.

Be sure to check out past Zakat boxes made of wood, glass and even a recycled ice cream carton!

Supplies
Cutting Mat
Shadow picture frame
Ruler
Glass paint
Zakat print out
Quatrefoil printout out
Blue painter's tape
Xacto knife
Recycled cardboard
Zakat Shadowbox Tutorial by A Crafty Arab

Take apart your frame, you'll need the glass for drawing and the back for a template.  Set everything else aside in a safe location.

Start by laying out your work Zakat on the cutting mat and tape it down.  Print out this pretty Green Eid quatrefoil patter here, and tape it down also.  Lay your glass over both and tape it down securely.
Zakat Shadowbox Tutorial by A Crafty Arab
We alternated green and yellow enamel glass paint to fill in the quatrefoils in a pattern.
Zakat Shadowbox Tutorial by A Crafty Arab
 We used the purple paint to write in the word, Zakat.
Zakat Shadowbox Tutorial by A Crafty Arab
 Try not to move the glass at all or it will shift.
Zakat Shadowbox Tutorial by A Crafty Arab
 Let it dry a few hours, or overnight, depending on the amount of sunshine in your hemisphere.
Zakat Shadowbox Tutorial by A Crafty Arab
Did you notice in the phtoo above how the yellow looks lumply compared to the green and purple?  Turns out we got a differne type of paint!  The green and purple were 3D and the yellow was Frosted.  So a bit of advise: pay attention in the store, unlike me. :)
Zakat Shadowbox Tutorial by A Crafty Arab
 Okay, returning to our project.  Take the back of your shadow box and lay it over your cardboard.  Cut our the same shape. Since we used a Cheeze-it box, my daughter thought it would be funny to use the cracker on the box as our back.

Zakat Shadowbox Tutorial by A Crafty Arab

Cut out a rectangle with the ruler and Xacto so that you can put money into your box.
Zakat Shadowbox Tutorial by A Crafty Arab
Put your shadowbox back together, starting with your painted glass and finishing with your cardboard backing. Make sure everything is secure before you lift it up.
Zakat Shadowbox Tutorial by A Crafty Arab

Start putting money into your box and see how much you can fill it up!
Zakat Shadowbox Tutorial by A Crafty Arab

Zakat Shadowbox Tutorial by A Crafty Arab
Related Posts Plugin for WordPress, Blogger...