Friday, August 3, 2012

Arabic Newspaper Star Tutorial

Today we made this star from our pile of Arabic newspapers. 

We thought it might be fun to have them hang from our kitchen table lights.   We might make more tomorrow, isA, since they were so easy to make!

Arabic Newspaper Star Tutorial


Supplies
Cardboard
Arabic newspaper
Ruler
Scissors
Glue
12 inch ribbon
Pencil


Measure and cut out your cardboard to be 2 inches by 2 inches.  Cut out two of these pieces.

Measure out and cut out 4 inches by 4 inches of your Arabic newspaper.  You'll need five of these squares for each star.

Okay, this is where there is a bit of Origmai involved, but it's realy not that complicated, so listen up.  Fold your paper in half lenghtwise and crease, then fold in half widthwise and crease.

Open the square up and then flip it over.  Fold the lower corner to the upper corner, open it up and then fold the corners in the other direction.  Your newspaper square will look like this:

 Fold along the vertical creases so that the paper folds down on itself and looks like this:

Do this with the other four pieces of newspaper.  After you have all five pieces folded in the same way, stack them on top of each other and glue them together.

Now take your two by two pieces of cardboard and put them next to each other.  Put your pencil in between the two so that you have a space of about 1/4 inch.  Glue a piece of ribbon about two inches wide down between the two pieces.  Take the rest of your ribbon, cut it in half and glue it down in the opposite corners.

Flip the cardboard cover over.  Glue down your stacked newspaper folded newspaper pieces on your front cover of the glued cardboard above.  Make sure that your newspaper pages are aligned and the open points are at the corners with the ribbon.  After one side is glued down, put your other piece of your cardboard cover down and glue that down too.


We found a nice image in the newspaper of a mosque interiour and used that as the cover of our star.  This way it looks nice when it's closed up and not used as a star.  It looks like a little book!

Now your star is ready to be used as Ramadan decoration.

Thursday, August 2, 2012

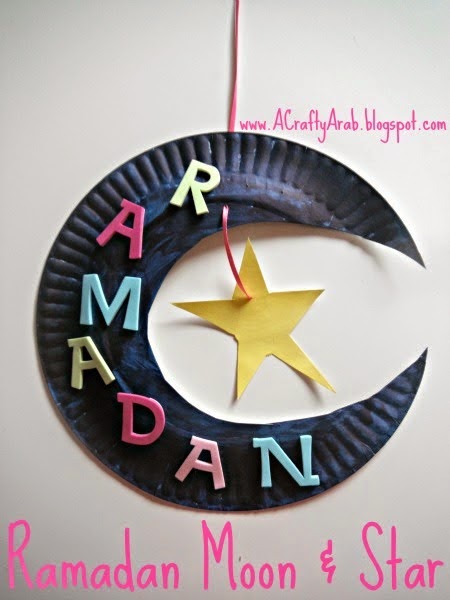
Ramadan Moon & Star Tutorial

Well, here we are, half-way through our 30 day Ramadan Crafty Challenge.  We have been having so much fun doing all these crafts. 

I have to admit, it's been great spending some one on one with each daughter as she does her craft. 

Today was my five year old's chance to create her own wall decorative hanging so she choose this Ramadan Moon & Star project.
Ramadan Moon & Star Tutorial


Supplies
Paper plate
Scissors
Foam stickers
Yellow paint
Blue paint
Sponge brush
Thin ribbon
Small hole punch
Newspaper


Draw out a crescent moon shape on your paper plate.  In the middle of that opening, draw out a star shape.

Cut out your moon shape.

Cut out the star shape.

Lay out your newspaper and paint the star yellow.

Paint your moon shape blue.

Take the paper backing off the foam letters and place them on the paper plate.  If you don't have the handy letters that come as stickers, you'll need to glue down your letters.

Hole punch your paper plate.  You'll only need one punch.

Hole punch your star and pul the ribbon through.  On the backside, tie a knot.

Pull your ribbon through the moon hole punch and tie another knot, so your star won't slip.  Enjoy your wall decoration!

Wednesday, August 1, 2012

Quilled Eid Mubarak Card

Quilling seems to be picking up speed as a craft lately. In July, my Beginning Quilling class at Ben Franklin Crafts and Frame had a record 8 participants! 8! I was shocked since at the same time last year it was cancelled due to lack of students. I can't wait to see who will sign up for my September class!  And my Live to Quill board on Pinterest has close to 500 followers with only 50 pins.  This is just all too exciting for me to witness as I've been quilling for about four years and it's nice to be able to share this craft with so many others.

So inspired by the popularity of Quilling, which was started by nuns during the Renaissance period by the way, today my oldest daughter and I made this Quilled Eid Mubarak Card:


Supplies
Solid color cardstock
Double sided tape
Blank card
Decorative edge scissors
Tweezers
Quilling tool
Quilling papr
Glue

Print out the words Eid Mubarak on your color cardstock.  Make sure it's the same size as your blank card.

Using the quilling paper, fold the it around the printed letters.

Once you have the folds done, place glue on your cardstock and hold down the folded quilled paper over the glue for a few seconds until it takes.

When we got to the D, we realized that it will be harder to do the inside of the letters of D, B, A and R, so we stopped working on the larger letters and did the inside of those letters first.


Once the edging of all your letters are done, they will look like this.

Now the quilling fun begins!  Using your quilling tool, start making shapes, but don't glue anything down just yet.

Your shapes should include loose circles, tight circles, S scrolls, C scrolls and any other ramdon spades you want to make.  Our pieces of blue quilled paper are only about 3 inches long, so they will fit into the outlined letters.

Start placing the quilled shapes inside your outlined letters.   You wat to play around with what fits and doesn't fit.

After all of the shapes have been put inside the outlined letters, now you can start glueing them in.  You don't need that much glue to hold them in, however, I'd recommend glueing the shapes in several places: to each other and the outlined walls.

Use your decorative scissors to cut out the quilled letters from the colored cardstock.

Put some double sided glue on your blank card and place your quilled letters on top.

You are done, so be sure to give this card to someone you love.  This card is best given in person (so you can see their face!) but if you have to mail it, be sure to protect it with bubble wrap.

Here is a little close up shot so you can see how fun it is to be random with your shapes.


Related Posts Plugin for WordPress, Blogger...