Monday, July 13, 2015

Eid Hol(e)y Lanterns Tutorial


Eid lanterns are so easy and fun to make. 

You just need a piece of paper, scissors and some double sided tape and anyone can make one

We first showed you how to make Eid Tea light Lanterns and then started getting fancy with vellum on our Mosque Night Light Tutorial and our Hanging Vellum Ramadan Lantern

With this tutorial, we've gone back to our basic design but decided to try out some new hole punches we just purchased  Instead of holes, there are shapes like a flower, butterfly, maple leaf, among others.  I can't wait to try them on different activities.

Let's make art!

Supplies
9x9 cardstock in purple and yellow
2 hole punches
Decorative scissors
Double sided tape

Fold your paper in three locations, accordion style.  You'll notice this creates three mountain points and two valley points.

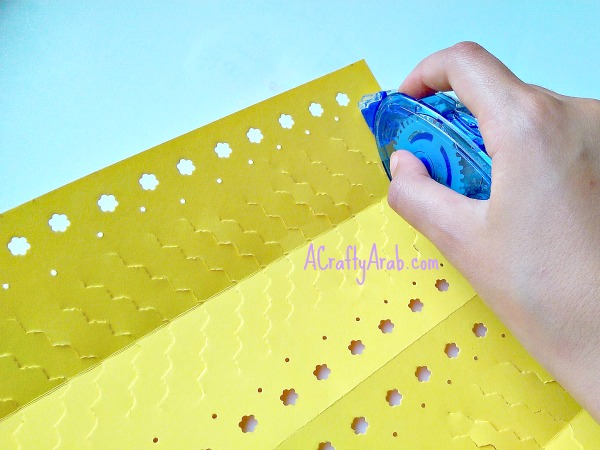
Hold the paper towards you that has the three mountain points and create holes with your flower punch all the way down the paper.

Take your smaller hole punch and create tiny holes in between each flower punch.

Flip your paper around so that the two valleys face you and cut your paper at a slat with the decorative scissors.

Open your paper and run a line of double sided tape all along one end. Bring over your other side, creating a cylinder shape.

You might want to have someone help a little with this step, but you basically need to "squish" your two lantern ends, very carefully, so that the two valley points are now pointed out, becoming mountains.  We also pinched them a little closed once we got them all turned around to help them hold.

Place LED lights in your lanterns and enjoy! Never ever use real candles, and even with LED, you might want to be careful and not leave these unattended for too long.

Excuse the pun on words for the title, hole for the hole punches and Holy for the month of Ramadan. My eight year old thought it was hilarious!

Sunday, July 12, 2015

Kirigami Khatam Tutorial

Kirigami  Khatam Tutorial by A Crafty Arab
I love to work with origami paper as one of my mediums because it comes in so many fun styles and textures, for a relatively inexpensive price.

We used it again today to make this Kirigami Khatam, inspired by our Origami Khatma we made last week.

Kirigami is a variation of origami that includes cutting of the paper.  The Japanese word for to cut is kiru and the Japanese word for paper is kami. 

Kirigami usually starts with a folded base and cuts are made into the folds that create a design when opened. 

The most common form of Kirigami that we all might know are the snowflakes we made as elementary school children. Who knew we were so culturally diverse back then!

A khatam is an eight pointed star used in Islamic architecture, literature and culture.

Supplies
Red cardstock
Aqua shiny origami paper
Scissors
Bone folder
Scissors with a fine tip
Circle cutting template
Circle cutting blades
Cutting mat
Kirigami  Khatam Tutorial by A Crafty Arab
 
Start by cutting a red circle with your plastic cutting tool and blade. You can use any size you'd like, just make sure it's small enough to fit in your origami paper.
Kirigami  Khatam Tutorial by A Crafty Arab
 
Fold your circle in half and then in half again.
Kirigami  Khatam Tutorial by A Crafty Arab

This next step is important and must be followed up with a bone fold to make it nice and crisp.  If you look at the photo below, you'll see that we folded the paper in half again, but in opposite directions.  You accomplish this by folding over one side in one direction, then flipping your paper over and folding the other side in the oppose direction.
Kirigami  Khatam Tutorial by A Crafty Arab

Cut off the round part of your shape.  Now your new shape should look like the tip of an arrow.
Kirigami  Khatam Tutorial by A Crafty Arab

Holding the paper very snug so there is no movement, cut out different shapes and designs on the side of your shape.
Kirigami  Khatam Tutorial by A Crafty Arab

Open your khatam and add glue all over.  Notice we put very little glue.  You don't want to saturate the paper and/or have the glue ooze out of the sides.   A little glue goes a long way!
Kirigami  Khatam Tutorial by A Crafty Arab

Lay your glue side down on the shiny part of the origami paper and cut around your kirigami khatam shape, leaving a nice border.
Kirigami  Khatam Tutorial by A Crafty Arab

 
Let it dry and your Kirigami Khatam is complete!  You can add it to your window display, use it as a gift tag for an Eid present, or decorate your kitchen cabinets with a few of them, which is what we are planning to do!
Kirigami  Khatam Tutorial by A Crafty Arab

Saturday, July 11, 2015

Yemeni Trivet Tutorial


When we try to think of new crafts to make here on A Crafty Arab blog, it's always fun to think of ways we can reproduce the different Arab flags.

Today we thought we'd create the Yemen flag trivet.  For those that don't know, a trivet is an object placed between a hot bowl or tea kettle, and a wood surface, to protect it from damage.

Supplies
Wood beads
Wire
Red, white, and black paint
Paintbrush
Palette
Newspaper
Wire cutters
 
We started by stringing our small beads with the wire.  We used five wood beads, but you might use more or less, depending on how big you want your trivet.  Our trivet is miniature size in the photo, but you are welcome to use larger beads if you'd like to make this a trivet for a serving dish or bowl. Twist the wire closed and cut off ends.
 
You'll need to string a second and third circle of beads, making each one larger to fit around the smaller circle.
 
Paint the smallest circle black, the middle size white and the large red to represent the three stripes of the Yemen flag.
 
Your three circles will now look like this.
 
Place the three circles in each other.  Wire a few beads from each size to each other to secure the circles.
 
Now your Yemeni flag trivet is ready for your teapot and this afternoon's tea party!

Related Posts Plugin for WordPress, Blogger...