Tuesday, July 29, 2014

30 days of Ramadan Crafty Challenge Roundup (2014)

30 days of Ramadan Crafty challenge roundup (2014)
I started the 30 days of Ramadan Crafty challenge back in July 2011 to give me and my three young daughters a creative outlet to celebrate this holy month of their heritage and culture.

I also live a fair distance from my family, so these crafts bring me closer to them by allowing me to reminisce about my extended family and growing up Muslim in Libya.

Please enjoy this alphabetical list of the 30 free Arab and Islamic DIY craft tutorials we made to celebrate the days of Ramadan 2014. 

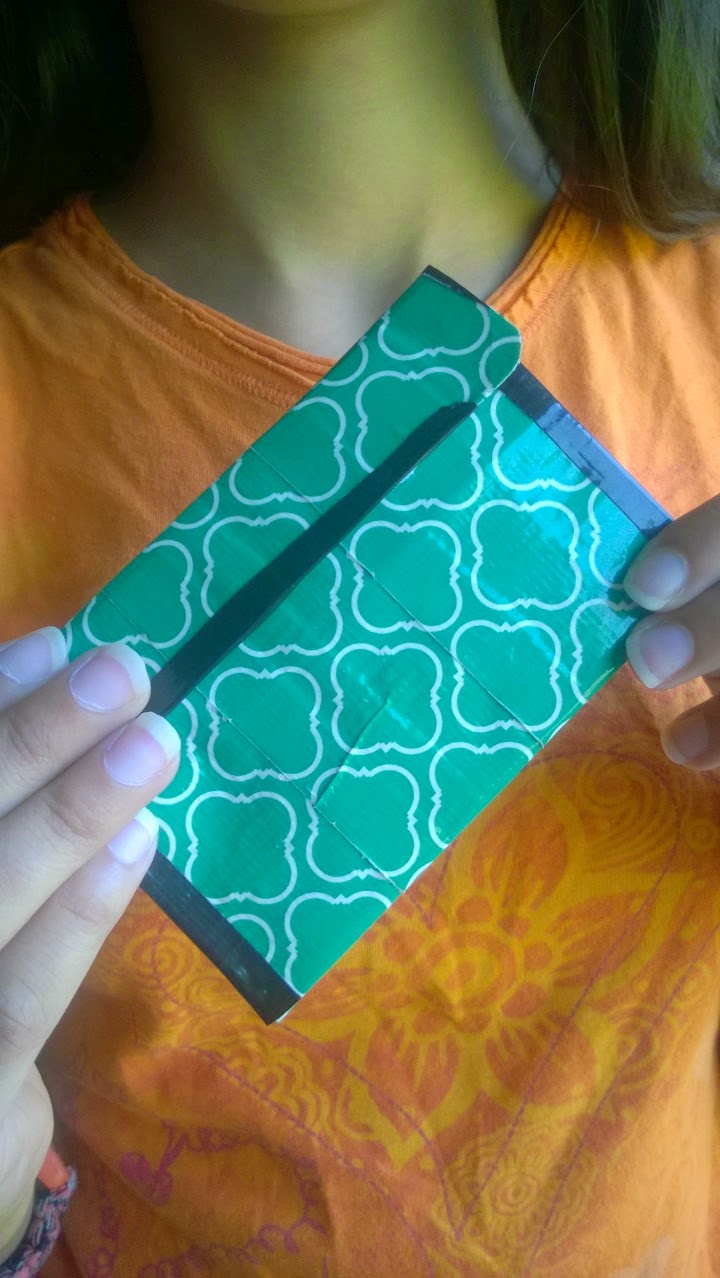
1.   Arabesque Wallet Tutorial
2.   Arabesque Window Cling Tutorial
3.   Arabic Letter Window Ornaments
4.   Bahrain Crayon Holder Tutorial
5.   Begin Everything With Bismillah Free Printable
6.   Camel Glass Mosaic Bibelot Tutorial
7.   Cardboard Mosque Tutorial
8.   Djibouti Treasure Tin Tutorial
9.   Duct Tape Eid Sheep Earrings
10. Egyptian Mummy Charm Tutorial
11. Eid Cake Banner Tutorial
12. Eid Confetti Bag Tutorial
13. Eid Craft Stick Frame Tutorial
14. Eid in an Eggshell Tutorial
15. Eid Money Foam Envelopes Tutorial
16. Eid Night Light Tutorial
17. Eid Poppers Tutorial
18. Eid Rattle Drum Tutorial
19. Glittery Ramadan Frame Tutorial
20. Happy Eid Candle Tutorial
21. Ishmael & Family Story Shadow Puppets Tutorial
22. Islamic Prayer Mat Tutorial
23. Peg Muslim Dolls Tutorial
24. Ramadan Crescent Moon Pompom Tutorial
25. Ramadan Kareem Wallies Tutorial
26. Ramadan Lantern Card Tutorial
27. Ramadan Moon Sun Catcher Tutorial
28. Ramadan Suhoor Sharpie Mug
29. Red, White & Blue Hanging Eid Favor
30. Rub el Hizb Fabric Magnet Tutorial
If you would rather see the images of the above items, make sure you visit my Pinterest board for this year. And follow me to get updates for 2015!
30 days of Ramadan Crafty challenge roundup (2014)

Monday, July 28, 2014

Blessed Eid Al-Fitr (2014)

Eid Mubarak*!

We made it through another Ramadan, alhumduAllah.  Is it me, or did this month fly by?

Our Seattle weather went mad with heat waves and thunderstorms, days apart.

The world went mad in Gaza, Iraq, and Libya and continues to be mad in Syria and Egypt. And our brothers and sisters in Ukraine and Malaysia also suffer.

Let us all take this day to reflect on how our fasting has brought us closer to Allah, our family, our community, and the other 1.65 billion Muslims in the world today. Use this Eid al-Fitr as a day of thanks giving.

We will celebrate by gathering with loved ones and giving children gifts.  And yes, after 30 days, we will take a day off from crafting and rest. I'll write a wrap up post tomorrow of all the crafts we did.

Once again, I am most grateful to have spent time with each of my 3 girls, coming up with the crafts, creating the crafts, remaking the crafts in some instances, but most important, talking to her about her religion.

I wish all my friends, family, and followers peace for the upcoming months ahead and may Allah have forgiven our sins.
Eid Mubarak to you

*A common greeting during this holiday is Eid Mubarak, which means, “Have a blessed Eid!”

Sunday, July 27, 2014

Cardboard Mosque Tutorial

We made it.  Our whole month of 30 days of Ramadan crafts are over.  We really enjoyed coming up with all the new Arabic and Islamic crafts!

I knew I wanted to create something special for today, but honestly had no ideas by the afternoon.  I decided a trip to Costco to buy all the food we need for our Eid gathering was a great way to procrastinate.  While I was there, I saw a corn box that had a fantastic opening on the side that reminded me of a mosque door.  I knew right away that I had to figure out a way to turn it into a toy for my youngest. When we got home, we made it a family affair.

I asked my husband to help with the cutting (box cutters can be a hard for little hands),  my oldest daughter helped with making square side pieces, my middle daughter helped design the dome and minerate and I designed and cut out the doors. 

My youngest got to enjoy the fruits of our labor by playing with the mosque non-stop since we put it together for her a few hours ago.
Supplies
Cardboard boxes
Box cutters
Sharpie
Pencils
T-square
Cutting mat

We used the pencil and Sharpie to draw out our designs.  It really helps to use the T-square ruler to make sure everything was even.

Use the T-square again with the box cutter to keep cutting stright.

The first piece we made was the side of the mosque, which was 8 x 5 1/2, with two side slits, one inch in.

You'll need to cut two exactly the same.

 The back of our mosque is 11 x 7, again with 1 inch slits on the sides, and an arched door.  To get the arched door, I made two lines 4 inches in from each side.  I used a cup to get the round of the archway.

The front of the mosque was cut the same way, but my daughter used a pot lid for the dome, and free hand drew the details on the top.

Once all your mosque is complete, it should look like this.

And if you cut your pieces just right, you can see through both doors!

Next, start on the minaret but cutting a 5 1/2 inches square.  Again, create slits 1 inch in.

Make sure you cut two sides!

Our minaret is 16 inches tall and at its widest, 5 1/2, to match our sides. We tapered in the sides before adding the dome (another pot lid) and a little detail on top. We also added a slit about 7 inches down to add stability to our pieces. The slits on the bottom and arch door was cut as above.

Make your second piece is identical to the first.

Because the minaret was so tall, we decided to add an attachment piece to connect the front and back towers. It is 4 1/4 wide by 3 3/4 tall.  We added the notices so it would fit into the minaret walls.
 

Here is what the minaret will look like once it's completed.

As an added bonus, you can use the stabilizer piece as an area where the muezzin calls the adhan.

And as you can see, my daughter used our Peg Muslim Dolls to play with this mosque all afternoon!

And here is a blurred photo of my youngest, having a grand old time with her new mosque. I haven't even told her she can color it if she'd like!

Saturday, July 26, 2014

Arabesque Wallet Tutorial

In the past, we have had fun making a differnet coin purse to hold the kid's Eid money that they get.  This year my oldest wanted to make a wallet instead of a coin purse to try out something new.

 I found this great Duct Tape design at Joann today that was on sale and we turned it into this when I got home from my morning errands.

Arabesque Wallet Tutorial
Supplies
Cutting Mat
Ruler
Xacto
Velcro circles
Cardboard
Arabesque Duct Tape
Black Duct Tape

Lay out the arabesque Duct Tape a little over 7 inches, sticky side up. Fold over one end by about 1/4 inch.

Lay down a black strip of black Duct Tape over the green with a little overlap by 1/4 inch.  Flip it over so now you have the sticky side of the black Duct Tape facing up Lay another layer of arabesque Duct Tape, continuing until you have a piece of "fabric" that is a little over 5 x 8. Lover over the last bottom edge so that sticky side is completely covered.

You'll need to cut your wallet to 4 1/2 by 7 inch.

Make sure the black side of the fabric is facing up and fold over the long end of the fabric 5 3/4 inch in.

Cut an extra little strip of black fabric to close up the sides.

Round out the edges of the wallet.


Cut the cardboard into a 3 1/2 x 1 inch piece.  Place it on the inside of the flap of the wallet and cover with a piece of black Duct Tape.

Place the Velcro circles in the flap.

Your finished wallet will look like this.

Friday, July 25, 2014

Eid Cake Banner Tutorial

I think my daughter is more prepared for Eid then I am this year, to be honest.  She has been trying out different cake recipes. I have been too swamped with orders from Zibbet* and my other shops to take some time to prepare.

Today, she made us this chocolate graham cracker cake, but when it was all done, it looked like it could use a pop of color.

While we waited to taste the deliciousness that I'm sure is on the inside, we spent the afternoon designing and coming up with this Eid cake banner.
Eid Cake Banner Tutorial

This was so easy and inexpensive to make (the chipboard stickers were our only expense, and they really are worth their cost, I promise) that we are going to make more for the cakes my daughter wants to make for friends over the weekend.

The hardest part now is the waiting for tonight to dig into this cake!

Supplies
Florist foam
Bamboo wooden skewers
Ruler
Chipboard letter stickers
Chipboard flower stickers
Scissors
22 gauge gold wire
Wire cutters

We started by measuring our cake so we could find out what words we could write.  Our cake was 9 inches wide.  I had wanted to write Eid Mubarak (blessed Eid), but our letters are too big. We decided to stick with just Eid.

Place your skewers in your florist foam six inches apart.

Our chipboard letters popped right out of their sheet and we were lucky that the backing came with them.  If you letters don't come off with the backing, use your scissors to cut out the backing as you'll need it.  Check the spacing of your letters and flowers to make sure they fit. 

Cut a piece of gold wire 12 inches long.

Gently pull back only the top part of the sticker backing and place the wire inside.  Press the sticker closed again with the wire in-between.

Wrap the wire around the skewers and cut off any excess ends.

 Cut your skewers in half and place each end in the cake.

*Opps, it looks like Zibbet is down from too many orders!  Actually it's going through a huge remodel that will make it bigger and better.  Be sure to check it out on next week.  And with two days off, it'll be nice to use up a mini vacation to get in the mood for Eid!

Thursday, July 24, 2014

Eid Rattle Drum Tutorial

Eid is just a few days away and with every Eid I reminisce of being in an Arab country during this magical time.

The fondest memory that always comes up is the amount of noise there is around Eid.  For three days there is singing, dancing, fireworks, cannons, guns, ululating, and of course drums.

It's as if the world has woken up from a month long nap and is bursting with gratitude.

Muslim children were always trying to get in on the noise action with miniature rattle drums. I told the story of these drums to my kids and they immediately wanted to make their own.

This is what we came up with today.
 
I had to take it away after a few trial rattles, but I promised I would return it on Eid.

Just in time to get some earplugs. I guest I forgot about the amount of noise there is around Eid because I was the child making the noise!

Supplies
Bamboo skewer
Decoupage oval box
Yellow paint
White paint
Ribbon
Beads
Newspaper
Paintbrush
Pen
Pink Sharpie
Hole punch
Khatim Template
Glue (not pictured)


Place your khatim template on the lip of your decoupage box and trace out the design.

Paint the inside of it white.  You might need two layers to really make it bright.  Let it dry.  Lay out the newspaper and paint the rest of the lid, and box, yellow. 

Punch a hole on one end of the box.  Make sure to not put it towards where the lid will be covering the hole.

Punch your bamboo skewer in and add a touch of glue to the end.  Attach it to the other end of the box.

Punch two more holes on the sides of the box, trying to follow the rule above (not covering the lid) and also trying to make them a little even.

Add your ribbon and tie a knot on the inside.

 Here is a fun part we didn't anticipate.  The beads that my daughter picked out had too small of an opening for the white ribbon.  So we picked different beads, with much bigger openings, plus we picked much thinner ribbon. You can see the difference below.

String your ribbon through the side hole and tight a knot on the inside.  Our ribbon was 5 inches long, but I'd suggest you go up to 7 inches to make tying the not easier.

Add the beads to the other end and tie two knots on top of each other.

Write out the word E I D on your lid with the pink Sharpie.

Outline your pink letters in black to really make them pop out.

Add glue along the edge of the box and attach the lid.

Let it dry. Then make some noise by twirling it between your hands.  The beads will swing and hit the front and back.


Related Posts Plugin for WordPress, Blogger...