Wednesday, July 31, 2013

Somali Flag Pennant Tutorial

Somalia is a country located in the Horn of Africa and was added to the Arab League in 1974.  The flag itself was adopted in 1954. 

The five-pointed white Star of Unity in its center represents the five Somali ethnic groups.

The blue is said to have been influenced by the United Nations, or that it represents the Indian Ocean or the wide open skies.

We learned about Somalia today as we made it's flag.  Now when we walk down our hallway, we'll be thinking of our Somalian brothers and sisters during this Ramadan.
Somali Flag Pennant Tutorial

Supplies
White felt
Blue felt
Star template
Ruler
Dowel
Scissors
Sharpie
Thread
Needle

Measure out your pennant to 12 inches tall with 30 inch x 30 inch with the Sharpie. Cut out the blue felt.

Draw out the star template on the white felt with the Sharpie.  Cut out the star shape.

Take the dowel and place it about two inches from the end of the blue felt.  Fold the felt over the dowel and straight stitch from one end to the next.  You'll need to cut off the tiny triangles on either end of the felt.

Blanket stitch the star on the other side of the blue felt.

We just hung up our star with pins.  However, you can also use wire or embroidery thread and attach it to the end of the pennant.


Tuesday, July 30, 2013

Ishmael and Family Story Stones Tutorial

Today we talked about the story of Ishmael and Hagar. The entire story is below, underneath our craft.

To tell our story, we made these story stones of the characters Ishmael as a baby, Hagar the mother, Abraham the father, and two stones for the Al-Safa and Al-Marwah mountains.


Ishmael and Family Story Stones Tutorial by A Crafty Arab

Supplies
Small stones
Small hole punch
Scissors
Black cardstock
Beige cardstock
Pencil
White quilting pencil
Assorted fabrics
Black sharpie
Mod Podge
Foam brush

Take the beige carstock and use the hole punch to cut out two circles for faces. We also cut out a much smaller circle for Ishmael. With the pencil, draw out four little lines for the arms. Use the white quilting pencil to draw out hair for Abraham and a hijab for Hagar. Cut everything out.

Cut out two small pieces of fabric for the clothing of Hagar and Abarhaim and a smaller piece of fabric for Ishmael. Cut out three triangles from a different fabric for the mountains.

Take the Sharpie and draw out two small dots for eyes on all three faces.

Once all your pieces are cut out, lay them on the stones to make sure everything fits.

Wash the stones and let them dry for a few hours. When they are dry completely, cover the area that the fabric will go on with the Mod Podge. Make sure it's very wet. We found that our stones were quite dry and soaked up the liquid.

Place the fabric on top of the stone and put a second coat of Mod Podge over the fabric. Everything will appear white, but once dry it will be clear.

Lay out your pieces to dry in the sun or over night.

Once your story stones are done, read the story below while you are playing with your stones.

Hagar and the Two Mountains
Islamic tradition says Prophet Abraham brought Hagar and their son, Prophet Ishmael, to a land called Paran-aram or (Faran in Arabic, in latter days held to be the land surrounding Mecca). The objective of this journey was to "resettle" rather than "expel" Hagar. Abraham left Hagar and Ishmael under a tree and provided them with water.

Hagar asks Abraham who he is entrusting herself and Ishmael to as he leaves them. He answers that he is entrusting them to God, to which Hagar then makes a reply that shows her faith, stating that she believes God will guide them.

Hagar and Ishmael then run out of water and Ishmael becomes extremely thirsty. Hagar is distressed and searches for water, running back and forth seven times between the hills of Al-Safa and Al-Marwah. Hagar is later remembered by Muslims for this act during the Hajj, or pilgrimage, in which Muslims run between these same hills as part of the Sa'yee.

When she returns to Ishmael, she finds either him or an angel scratching the ground with their heel or finger, whereupon water begins flowing and Hagar collects some or dams it up. This spring or well is known as Zamzam.

At some point, a passing tribe known as the Jurhum sees birds circling the water and investigates. They ask Hagar if they can settle there, which she allows, and many versions say as Ishmael grew up he learned various things from the tribe.
Ishmael and Family Story Stones Tutorial by A Crafty Arab

Monday, July 29, 2013

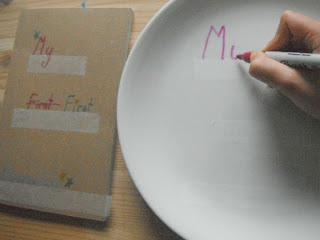
My First Ramadan Sharpie Plate

When you are introducing Ramadan to a young child it's good to start slow the first few years.  It's also a good idea to make it fun for them. 

Today we made this plate so that our meals were a little more pleasant.


Supplies
White porcelain plate
Sharpies*** Oil Based ONLY
Tape

Place tape down on the plate so that it's easier to write in a straight line.

My daughter wanted to practice writing out the words 'My First Ramadan' on paper first so she'd know how it would fit.  You are welcome to do this also, or just write on the plate directly.

Bake it for 30 minutes at 350 degrees. Allow them to cool completely before washing or using.

Seriously, you've reached the end of the directions.  How easy was today!!!

***Update - the regular Sharpies don't work!  Make sure that you are using the Oil Based Paint Sharpies.  We learned our lesson and fixed that when we made our Ramadan Suhoor Sharpie Mug.

Sunday, July 28, 2013

Woolly Sheep Eid Mubarak Card

We made more Eid cards today! But my five year old wanted to get involved, so I thought it might be nice to make easier cards for her. We had some left over fake wool fabric from a previous project and used it to make this black sheep Eid Mubarak card.


Supplies
Furry fabric
Glue
Scissors
Blank card
Googly eyes
White quilting pencil
Grass punch cutter
Grass background cardstock
Solid green cardstock
Solid black cardstock

 Feed the solid green cardstock through the grass punch cutter.  If you don't have one of these, just randomly cut lines into your cardstock to make it look like grass.

Take the green grass cardstock and glue it to the edge of the grass background cardstock .  Once that dries, glue them both down to your blank card.

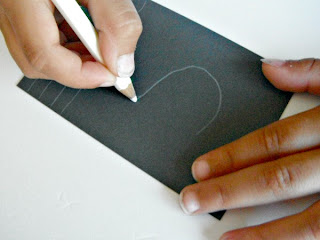
With the white quilting pencil, draw out three lines across the short end of your black cardstock.  On the other side, draw out a sheep face and ears.

Cut out the four legs and cut the ends into a V so that they look like hoofs.  Cut out the sheep face and ears and glue on the googly eyes.

With your white quilting pencil, draw an oval on the back of the furry fabric and cut it out.


Glue down all your pieces to the card front and write Eid Mubarak at the bottom of the sheep.


Saturday, July 27, 2013

Arabic Numbers Toss

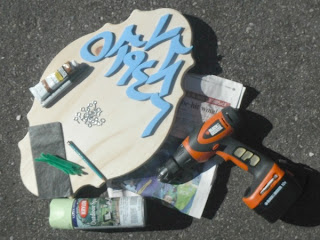
For our upcoming Eid party, we wanted to have a toss of some kind for the little kids.  This Arabic Numbers Toss will be perfect.  There is quite a bit of drying time on this project, so be sure to read all the steps ahead of time.

This afternoon, after we made our toss board, the girls created guidelines for how to play.  This includes how far back each age group would be allowed to stand and how many tosses each player gets.  I only wished we had different colored pipe cleaner to keep track of the different players.  You can also use different things for the toss, such as plastic bracelets or shower curtain rings.


Supplies
Large precut wood board
Arabic numbers stencils
Drill
Spray paint
Carbon paper
Pipe cleaner (precut to 3 inch pieces)
Pencil
Cup hooks
Sharpie
Brown acrylic paint
Paintbrush (not in photo)

First lay out your stencils on the board to see how much room you'll have.  Make a small pencil mark above your number for the cup hook.

Drill a hole for the cup hooks.  If you don't have a drill, you can also try an awl to start your cup hook opening.

Spray paint your board and give it time to dry completely.

Place the numbers back under the holes and trace them out with your carbon paper and pencil.

Paint in the lines of the numbers with your brown acrylic paint.  Allow everything to dry before you go to the next step.

Outline your letters with Sharpie so you can see them better from far away.

Twist in the cup hooks.  The cup hooks we got ended up being closed and we didn't notice it until my daughters tried to thrown the rings.  So as you can see from the final photo, we just opened them up a tiny bit with pliers.  So when you are buying your cup hooks, make sure they are pre-opened (otherwise, just take two pliers and pull). 

Take your pipe cleaner and make it into a circle by twisting the ends together.

Enjoy your game!

Friday, July 26, 2013

Eid Mubarak Sheep Magnet

This adorable chalkboard Eid Mubarak Sheep Magnet is such a great addition to our Ramadan magnet wall on our refrigerator.  She is keeping the Crescent Moon Magnet company!

Please read through all the directions before you start as this is a long craft and does take a lot of drying times.  Allow extra time in your day to accommodate all the steps.


Supplies
Box cutter
Self stick magnet
Chalkboard ornament
White acrylic paint
Black pen
Paintbrush
Wood pieces: 1 large heart, 1 small heart, 3 petal shapes, 2 mini craft sticks
Wood glue


It's easier to start by cutting the wood sticks in half for the legs. Please have an adult do this part.  The sticks actually only took a tiny bit of pressure to cut halfway through, and then I just snapped them in half.  The part that you are cutting will be behind the sheep, so a clean cut is not necessary.
*Our chalkboard ornament also came with a ribbon loop that we used the box cutters to take off.

Paint all the wood pieces white.  And make sure to put newspaper down.  We forgot to grab it before we got started so that is why you don't see it on the supply list above :).  Wait for everything to dry.

A little note about the painters tape I put on the chalkboard: Don't do it.  Instead, find a small brush and help your child stay within the lines.  As you an see from the final pictures, the painter's tape tore off a lot of the chalkboard.  And that is why I took it off the supply list.

Place the smaller heart on top of the bigger heart and glue it upside down with wood glue in the upper right corner.  Take two of the petals and glue them behind the larger heart to look like ears.  Allow everything to dry.

Flip the sheep over and glue down the four legs and use the final petal for the tail in the opposite corner from the head.  Allow everything to dry.

Start drawing cursive 9s all over the body of the sheep.  Also draw them around the outer part of the large wood heart.

Draw two ovals for eyes and a large Y for the nose and mouth.  On the tail, place an extra large 9. For the hooves, you'll need a half circle with lines drawn inside of it.  That is all it takes!  Your sheep should be looking adorable at this point.

Place the self sticking magnet on the back of your sheep.

You can write a message on the magnet with chalk or you can paint a design on it.  We pulled out some pink stickers and wrote out the words since it was easiest :).

Related Posts Plugin for WordPress, Blogger...